1. Getting Started
Hello and welcome! Thanks for purchasing a DataLooper Pedal. This guide will get you up and running in no time. The videos and downloads in this guide are also included on the resources page, so if you just want the goods and not the guide, head there instead.
What we’re setting up:
By default, the DataLooper comes configured to control 9 loopers in Ableton Live. Although it can be configured to do nearly any MIDI task you like, this guide will focus on getting your DataLooper up and running with its default configuration.
Make sure you have the following ready to go.
- Your DataLooper pedal in hand
- The USB B cable that came with the DataLooper
- A solid USB connection, either from a direct port or powered hub.
- A licensed copy of Ableton Live 9 or newer
Installing the software:
DataLooper communicates with Ableton using a driver of sorts called a ‘Remote Script’. Here’s how to install the script and enable communication.
First, Download the appropriate install package:
Mac Users
After downloading the package, follow the instructions on screen to finish the install. You may have to change your security settings to allow installs from unidentified developers.
The install file will automatically copy the script to the Ableton installation, and create a ‘DataLooper Firmware’ folder inside your Applications folder, with the latest firmware version and the firmware update tool.
It is recommended you update the firmware to the latest version, by opening ‘TyUpdater’ with the DataLooper connected, pressing upload and selecting the .hex file included in the DataLooper Firmware folder (rev 1 firmware is for the pedals with the white graphics, rev 2 firmware is for the pedals with the grey graphics).
After this is done, continue past the PC installation instructions to the “Setting up Ableton” section.
PC Users
- Unzip the file. You should now see a folder named DataLooper containing a bunch of files.
- Navigate to the following folder.
- Windows 10: C:\ProgramData\Ableton\Live (9, 10, etc..)\Resources\MIDI Remote Scripts\
- Windows 11 / Ableton 11 : Follow Ableton’s instructions for installing 3rd party remote scripts: https://help.ableton.com/hc/en-us/articles/209072009-Installing-third-party-remote-scripts
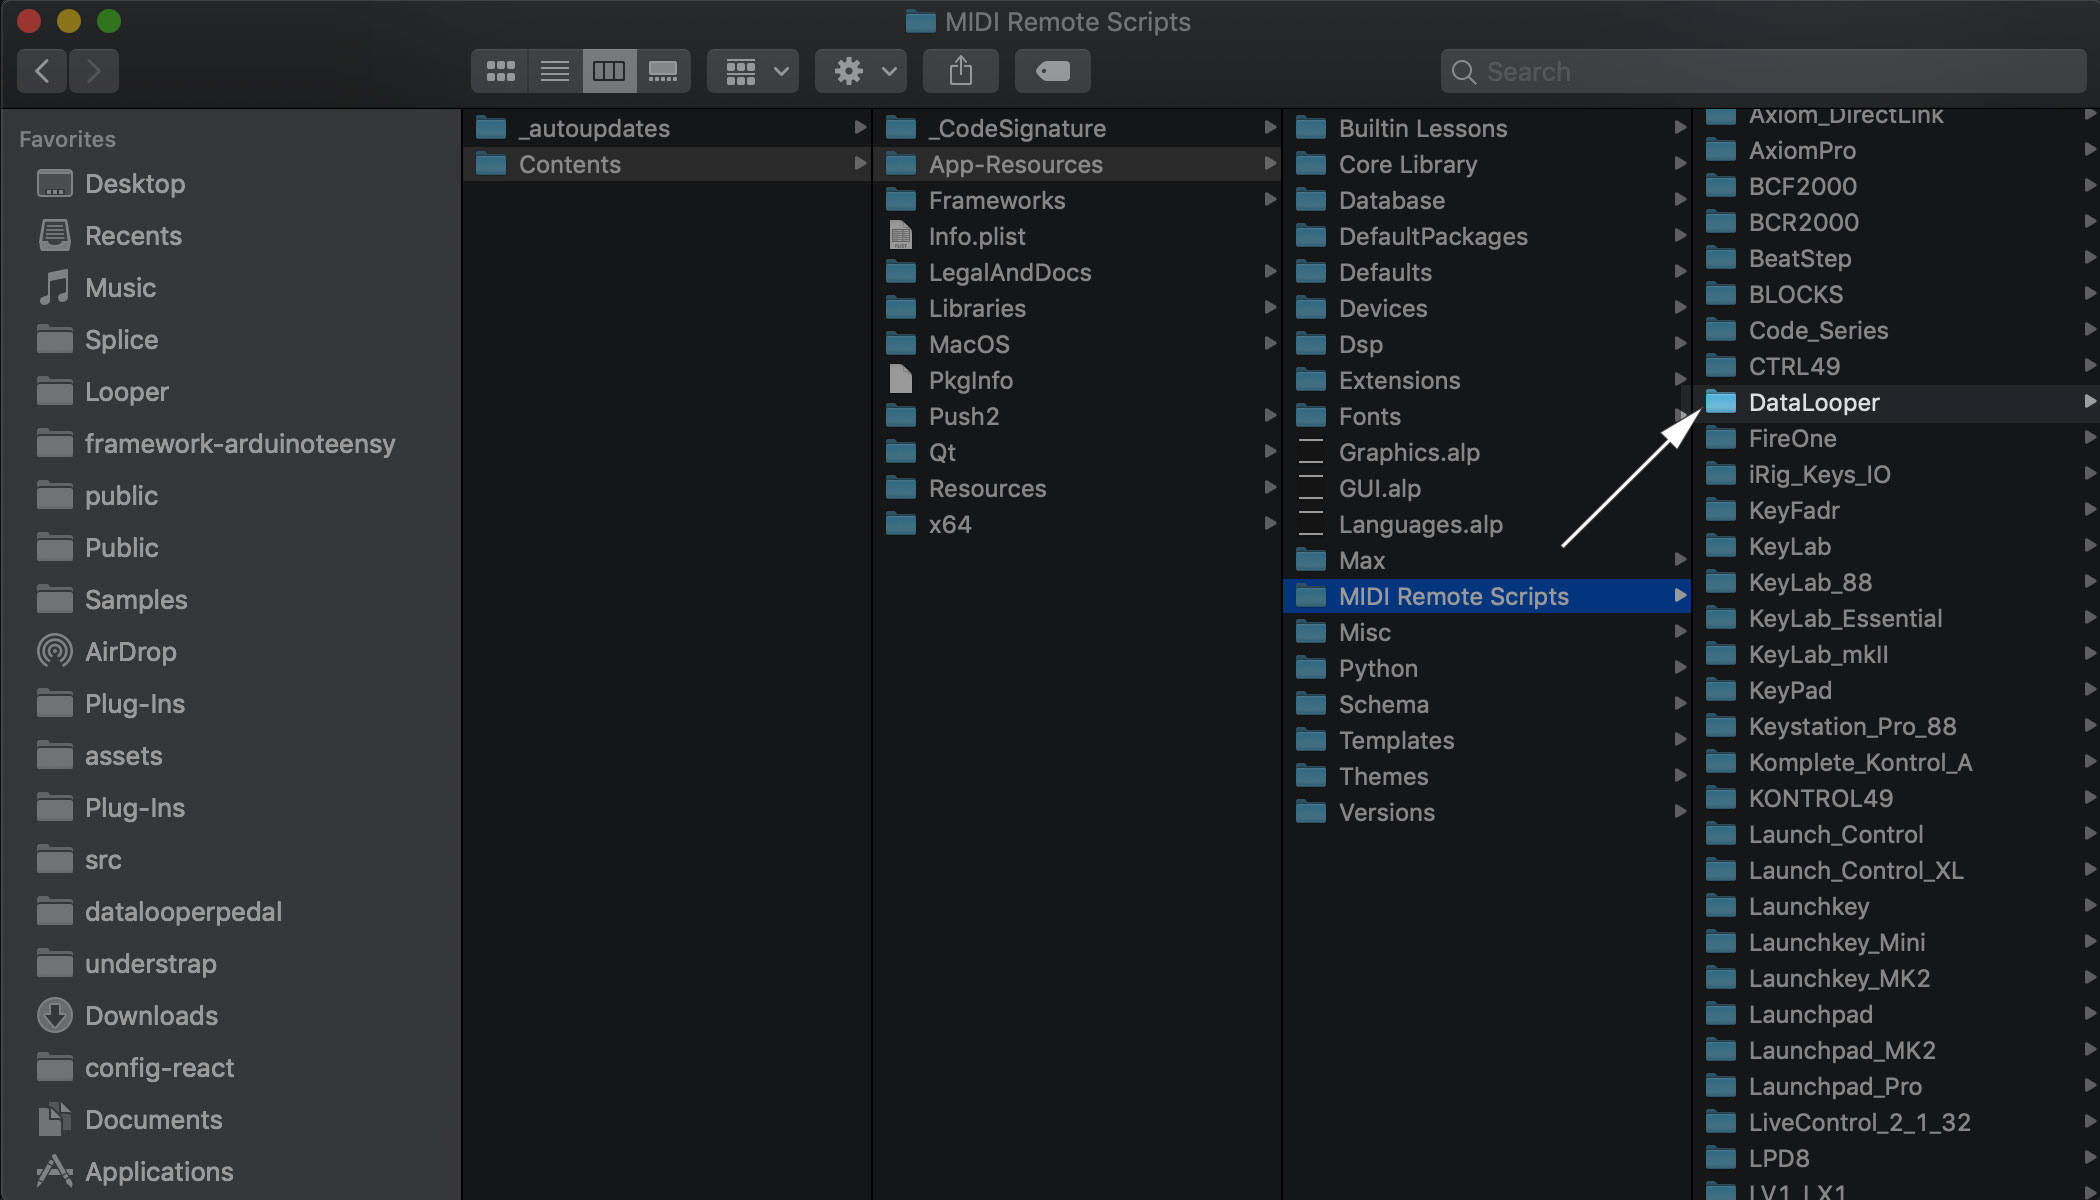
- Drag the newly downloaded and unzipped DataLooper folder inside the MIDI Remote Scripts folder. Make sure you drag the entire folder and not just the files in. Also, make sure the folder does not accidentally end up in some other sub folder
Setting up Ableton
- Plug in your DataLooper via USB
- Open up Ableton Live
- Navigate to Preferences->Link/MIDI
- In the ‘Control Surface’ column, choose an empty row and use the dropdown menu to select ‘DataLooper‘
- In the same row, select ‘DataLooper‘ as both the Input and Output device using the dropdown menus.
- In the lower half of the settings area, under MIDI Ports, you should see a row that says “Input : DataLooper”. Make sure Track and Remote are both turned to On.
- Exit the Preferences dialog.
- Things should look like this:

Let’s Get Looping Eh?
You’re now ready to make your first loop. We’ll use the a pre-built Ableton set to get started, but don’t worry, DataLooper is compatible with any Ableton session.
- Download this Ableton demo set
- Open up DataLooperDefault.als
- The first column on the DataLooper should light up white. If this does not happen, review the software installation steps.
- Double check your Audio Interface settings and make sure you have a valid input/output device selected.
- Hit play on the transport. If the first column of LEDs start blinking. You’re in business. If not, review the previous steps.
- The volume on the master channel in the default set is all the way down to avoid feedback. Adjust accordingly.


Default Configuration
* For purchases made after August 1st, 2020, this is no longer the default configuration. Please reference https://youtu.be/xZXATQMU19s for a complete breakdown of the new configuration.

Step by Step
Let’s break down what’s going on in the default setup. As you can see each looper occupy’s a row, whereas each command type occupy’s a column (with the exception of the last column).
Column 1 | Record/Overdub/Play:
These controls emulate the functionality of the ‘big record button’ on the Ableton Looper.
- If the looper is clear, a press will trigger ‘record’
- If the looper is stopped, a press will trigger a ‘play’ command
- If the looper is playing, a press will trigger an ‘overdub’ command
- If the looper is overdubbing, a press will trigger a ‘play’ command
- Keep in mind, when in normal mode, the record and play commands are quantized to the global clip quantization setting.
Column 2 | Stop/Clear:
- If the looper is playing or overdubbing, a press will trigger a ‘stop’ command
- If the looper is stopped, a press will have no effect.
- If the looper is recording, a press will clear the loop.
- A long press (.5 second hold), will clear the loop immediately.
- Again, keep in mind the ‘stop’ command is quantized to the global clip quantization setting.
Column 3 | Undo/Bank:
- If the looper has an undoable overdub, a press will trigger an undo/redo.
- The LED on this button indicates which bank is currently selected.
- A long press on this button will switch to one of the three default banks, addressing loopers 1-3, 4-6 or 7-9 depending on the currently selected bank.
Column 4 | Master Commands:
- Bottom right : Stop/Start All
- This button addresses all the loopers at once and will toggle between stop and play commands. (This is quantized)
- Middle right : Mute/Unmute All
- This button addresses all the loopers at once and will toggle between a muted and unmuted track state. (This is not quantized)
- Top right : Clear All/Enter New Session Mode
- A single press of this button will clear all loops
- A long hold will enter ‘New Session Mode’ (see next section)
New Session Mode
Upon entering ‘New Session Mode’, the LEDs that are linked to Looper record buttons will turn purple. In this mode, the record commands become unquantized. After a loop is recorded in this mode, the tempo will recalculate based on your newly created loop.
A few notes about this mode:
- When entering ‘New Session Mode’, the click track will automatically turn off and turn back on when exiting this mode.
- For accurate tempo calculation, you need to be very exact on pressing the button at the beginning and end of the loop.
- ‘New Session Mode’ does not work with clips, only Loopers.
- To exit ‘New Session Mode’, either record a new loop, or press the top right button.
Integrating DataLooper in your custom set.
DataLooper can be used in any Ableton set. Here’s how to get that working.
- Open up your custom Ableton set.
- Decide which track row you want to link up. For demo purposes, let’s say we want to link up Looper #1.
- Create a track named “DL#1”.
- Drop an instance of the Ableton Looper inside the track. (DO NOT USE THE LOOPER PRESETS, THE DEVICE NAME NEEDS TO BE ‘looper’)
- With the transport stopped, enter MIDI Map Mode (Cmd+m).
- Click the big record button on the Ableton device, then press the record command on the DataLooper. You should see a note message map to that control.
- Do the same with the stop and undo buttons.
- To map clear, press the clear button in Ableton, then press and hold the DataLooper stop button to trigger a clear command.
- Exit MIDI Map Mode (Cmd+m).
- Make dope beats.
Happy Looping
Ok, that about does it to get you off and DataLoopin’. Do check out the instruction manual for information regarding some of the more advanced features and how to loop using clips. Before we part, here’s a couple of tips while you’re playing around.
- For those of you who have never worked with quantized looping before, do keep in mind there is a learning curve. The looper is linked to the clock, so commands will not ‘execute’ until the clock lines up with your ‘Clip Quantize’ setting subdivision.
- In practice, this means that when you’re doing quantized looping, get in the habit of hitting the ‘record’ button a split second early to both start and end the loop.
- Keep in mind that ‘New Session Mode’ is not quantized, so you’ll have to train your foot to hit directly on the downbeat when you are in this mode.
- Trust me, there are some major benefits to quantized looping. Don’t give up!
2. Looper Control
While the above section was meant to be a general overview and getting started guide, this section will delve into the detailed options for controlling the Ableton™ Looper plugin.
Workflow
The Ableton™ Looper workflow is best suited for loop artists wanting to closely resemble the workflow of traditional hardware loopers, but add all the convenience, bells and whistles that come with Ableton Looping. Here are some points to consider when choosing the Looper workflow:
- Taking advantage of ‘New Session Mode’, you can work completely without a guide/click track.
- You have an unlimited number of overdubs.
- Audio loops are limited to 48 bars
- Different loopers have independent loop lengths, but synchronize via the global project tempo/signature
- Loopers always convert to audio, there is no MIDI looper (yet).
- You can linearly record your entire set and track loop creation, go back and fix things.
- There is no simple workaround to saving a loop for recall. You would have to resample it and wait for the loop to play in entirety.
- Loopers always change pitch when warping. This cannot be changed.
- There is only 1 undo/redo step.
Integration/Naming Convention
Ok, with that in mind, let’s look at how DataLooper integrates with the Looper. DataLooper works via a naming convention. The script scans for tracks containing ‘DL#’, then links up whatever number comes after the # to the corresponding looper on the pedal. For example, track DL#1 will link up to the 1st looper track on the pedal (this can be assigned to any button in the config software, but defaults to the bottom row). The naming convention is not exclusive; you can name the track “DL#1 – Keys” and it will still work just fine. You can also have multiple iterations of the DL track. Let’s say you have 2 tracks, 1 named “DL#1 – Keys” and another named “DL#1 – Keys 2”, they will both work. In this situation, LED control can be determined by adding LED to the track name. For example, if you want “DL#1 – Keys” to control the LED, name it “DL#1 – Keys LED”, and the LED will always match the state of that track.
Linking a new Looper Track
After you have a track with the special naming convention, make sure it has an instance of the Ableton™ Looper device on it. If you want New Session mode to work, be sure to change ‘Tempo Control’ to ‘Set & Follow song tempo’, otherwise it’s possible for loops to drift with the click track. Once the device is on the track, we need to MIDI map the controls. There’s a limitation to what you can control via the script, and it’s necessary to do this once; but once it’s mapped and the session is saved, you don’t have to do it again.
To map the controls, first make sure the transport is stopped, then press cmd+m (ctrl+m on PC) and the screen should turn blue. Then, click on the various controls of the looper, and press the corresponding button on the DataLooper pedal. If you are using the default preset, you’ll want to map the big record button to the leftmost control, then stop to the second from the left control. To map clear, press and hold stop until you see the value on clear change. Undo is mapped to the third button from the left. Repeat this process for every different looper in your set. Master controls (start/stop all, mute all, clear all) do not need mapping.
Fades
If you peek in the config software, you’ll see one of the options for looper control is a quick/long fade and clear. To make these work, first configure your DataLooper, then add a Utility plugin after the Looper instance. The clear will then automate the utility, effectively adding a ‘fade’ before clearing the loops.
New Session Mode
New Session Mode emulates the behavior of a looper that is currently empty. By default, you enter New Session Mode by holding the top right button on the DataLooper. When entering New Session Mode, all the LEDs that correspond to Looper record buttons will turn purple. The metronome will turn off, and the looper record buttons will now be unquantized, meaning you have to hit the record button directly on the downbeat of the beginning and end of the phrase you are playing. In addition, middle button on the farthest row to the right will serve as a tap tempo. Once a phrase is recorded, New Session Mode will automatically exit and calculate a new tempo. You should see the LEDs start blinking in time with your new phrase. There is definitely a learning curve to getting this right, so do not be discouraged if it doesn’t work right away. It takes some accurate footwork.
When Do I Hit The Buttons?!
It’s important to wrap your head around the concept of quantization. Since this whole system is more or less built upon it. Quantization means that commands are not necessarily executed immediately, but wait to execute until the next musical value. This locks everything together and allows you to have multiple loopers with completely independent lengths. You control how tightly everything is locked together with the “Quantization” setting on the lower left hand corner of the looper. By default, it’s set to global, which corresponds to the “Clip Launch Quantization”, which can be set by the dropdown located just to the right of the metronome on/off button.
This also means you have to get used to ‘requesting’ commands before the phrase actually happens. This little chart should help you wrap your head around this.

Do remember though, this changes when you’re in New Session Mode, as all the recording becomes ‘unquantized’ and accuracy is key.
3. Controlling Clips and Scenes
While not mutually exclusive, working with clips is a somewhat different workflow than working with the Ableton™ Looper plugin. Here are some workflow notes.
- Other than tap tempo, there is no way to calculate tempo via phrase like there is with DL# tracks.
- Audio clips cannot be overdubbed onto. There are workarounds to emulate this behavior, but not great ones.
- MIDI clips can, however be overdubbed onto, the undo button for MIDI clips also keeps going backwards, and is not an undo/redo.
- Clips can have an unlimited phrase length.
- You can set the type of warp method clips default to.
Workflow
Setting up for clip recording is easy. Simply make a track that has “CL#” and a number somewhere in the track name and it will auto-link to the DataLooper. For example, “CL#1 – Keys” will automatically link up to the controls on the DataLooper as soon as it’s renamed. The workflow for clips is simple. To keep scenes together, DataLooper scans through the session and picks the first slot just below the lowest vertically populated clip slot on a CL# track. It does this, assuming the CL# tracks work together to create coherent musical ideas and attempts to lock them together horizontally, rather than just populating the topmost clip slot. After recording a clip, the record button then deviates in function depending on if the clip contains MIDI or audio data. If it’s a MIDI clip, hitting record again will trigger an overdub; if it’s an audio clip, hitting record again will find the next available clip slot and start recording in that slot. By default, a long press on a MIDI clip will queue a new clip slot for recording and stop the old clip.
Fades
To make fades work, just drop a Utility plugin onto the desired CL# track. The Utility plugin will then automate the ‘gain’ parameter and create a fade effect before clearing the clip.
Clip Launcher
DataLooper also features a Launchpad™ style clip launcher. You can get there by adding a ‘Change Mode’ command in the config software, or by sending DataLooper a Program Change with #30. In Clip Launcher mode, the first three columns launch clips, whereas the last column is your navigation and exit control. The first three columns will light up with colors corresponding to the clip color. The top right button exits Clip Launch mode and goes back to whatever preset you were on. The middle right button is up, with a long press moving right, the bottom button is down, with a long press moving left.
When entering Clip Launch mode, a session ring will show in red on the Ableton session.
Fixed Clip Control
There may come a time when you just want to launch a clip without worrying where the session ring is at. This is what fixed clip control is for. You can add a fixed clip control in the config software. The track number is counted from left to right. You can launch clips with this control on any track, not just CL# tracks. The color of the LED will correspond to the clip color, although if the clip slot is empty, it will be off, then turn red if fired to record, then match the clip color once recorded.
Scene Launcher
This is perfect for launching backing tracks. The LED will correspond to the Scene color and will launch whatever specified scene number, counted from top to bottom. Add this control in the config software.
4. Global Controls
Global controls allow you to address global aspects of the session.
Global Looper Controls
Stop/Start All:
This command will globally stop all DL#, CL# and playing clips or any combination of these items (selected in config).
In quantized operation (selected in the config software), this will queue a stop on all loopers (if they aren’t all stopped), and then on next press, a start. These commands will respect the Clip Launch Quantization.
In unquantized operation, the loopers will immediately stop, not respecting the quantize setting, they will also immediately start, and the transport will jump to the next bar to keep everything synchronized.
Mute Controls:
With this action, you can mute all CL# tracks, DL# tracks, tracks playing clips or all tracks, selected in the config. You can also choose to toggle, mute or unmute.
Transport Controls:
These control the overall Ableton transport.
Tap Tempo:
Allows you to recalculate the tempo. The metronome will automatically toggle on/off.
5. Configuration Software
Located here, this web based config software gives you everything you need to reconfigure DataLooper to your needs. Programs are limited to 40 presets and 2 commands per button per preset. It is recommended you do not reconfigure DataLooper while running Ableton Live, as it’s possible conflicting SYSEX messages will interrupt the configuration process. You can always go back to the default configuration by downloading this default config file, opening it up with the config software and running it:
6. Standard MIDI
DataLooper can very much be used as a standard MIDI controller, replacing dinosaurs like the FCB1010. MIDI messages are sent via USB but also echoed on the 5-pin DIN MIDI port (SYSEX excluded).
Control Change Toggle messages turn the LED on and off. Control Change messages with the same CC# but different values will pass around the LED based on the last one pressed (useful for patch changes). I use DataLooper as my guitar pedal effects stomp board as well as a looper. You should too :).
7. Presets and Program Changes
DataLooper can house 40 presets. Why so many? I wanted this thing to be able to have a unique preset per song if so desired. Although there is no 2-digit display, you can change presets by either configuring a button to change to a preset, or sending DataLooper a Program Change message (you can do this via a clip in Ableton). Buttons containing a preset change action directing to the same preset you’re currently on are lit up. For example, if I’m on preset #1, and there’s a button that’s supposed to move to preset #1, it will be lit up. This is how the default setup indicates preset 1, 2 and 3. If you send a program change of 41, DataLooper will enter New Session mode, if you send a program change of 42, DataLooper will enter Clip Launch mode.